


Essential oils, (not to be confused with Fragrance oils) are known as a natural remedy for short-term relief of mild symptoms of stress, anxiety and insomnia and widely used in aromatherapy and massage therapy.
There are many essential oils and each one has its own peculiar properties as well as distinctive fragrance; some of the most popular ones are Lavender, Bergamot and Lemongrass. They are commonly added to diffusers, but did you know that you can also craft natural candles made with essential oils?
This is not only a great way to preserve and disperse the scent of your favourite extracts in your room, but the chance to create a precious personalised object that is as useful as it is fun to make!
So, without further ado, let’s follow this guide created by the ‘crafty’ Victoria from Cosy & Country on How to Make Essential Oil Candles:
Ingredients
- KeraSoy 4130
- Rose Gold Round Candle Tin With Welded Side Seam – 250ml
- 30ml Essential Oil – we used Lavender
- ECO 14 or TCR 33/18 wicks
- Glue Dots
- Wick Centering Tool
Our containers hold 250ml of wax each, so you will need to measure 500 g of wax to fill two containers nice and evenly. Once you’ve done that, pop the wax onto a medium heat and leave it to melt, remembering to stir it every once in a while.
Step 1 – Measure and Melt Your Wax

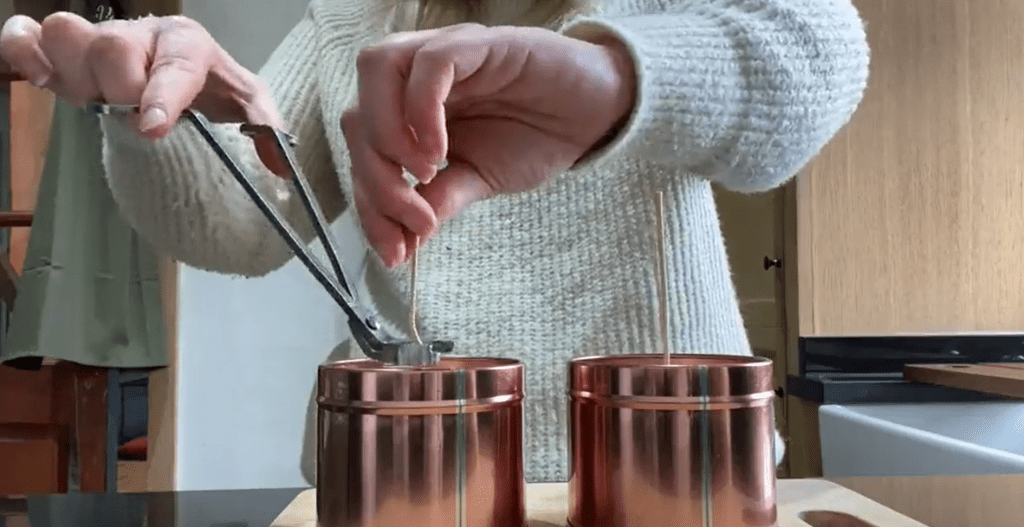
Step 2 – Prepare Your Containers
Whilst the wax melts, you can prepare your containers. Peel off one end of the glue dot and stick it to the base of your wick, then place the wick in the centre of the container and firmly press to allow it to be properly stuck to the base. Then, use your wick centering tool to hold the wick in place. Repeat this process for the second container.

Step 3 – Check the Wax Temperature
Return to your melting pot, give it a little stir and check that it has fully melted. Using your thermometer, measure the wax’s temperature to make sure it is between 60-65°C before you add anything to it.
Also, check your essential oil’s Flash Point, which is the temperature at which the oil will start to evaporate – for Lavender it is 70°C. You want to make sure the wax is at or below your fragrance’s Flash Point before you add it. However, if the temperature is too high, simply take the pot off the heat and allow it to cool down, otherwise, the fragrance might disperse once added.

Step 4 – Add Your Essential Oil
The ideal ratio of essential oil to wax is around 3%. In this case, Victoria has measured 15ml of Lavender Essential Oil for 500 g of wax.
Try to maintain this ideal ratio, as the oils have a high scent throw, therefore, if you want to maintain the aromatherapeutic properties, remember that sometimes less is more!
Once you have mixed your essential oil into the wax, pop it back onto a very low heat and gently stir, this will ensure that the oil is evenly distributed.
Side note. You can choose to add dye to your candle at this stage, just remember to keep the temperature around 65°C to allow for proper colour dissolution.

Step 5 – Pour… Pour some more and Let it Set
Once again, check that your wax temperature is around 50-55°C degrees, then gently pour the wax into each container.
Tip: Leave some room at the top of the container and leave it to set for 30 minutes, then add the remaining wax. This way you’ll make sure that the candles have smooth tops as the second pour will fill any sinkholes which might have formed.
Once the containers are topped up, leave them to cool off for around 24 hours.

Step 6 – Trim Your Wicks
24 hours later the wax should have nicely set. Now it’s time to remove the wick centering tool and trim the wick to around 5mm.
Step 7 – Light Up & Relax
Well done! You can now start burning the candles and enjoy the fragrance and therapeutic benefits of your favourite essential oils.
Also these cute tin containers are simply perfect for thematic printed labels and personalised decorations that could make a unique gift.


Leave A Comment