


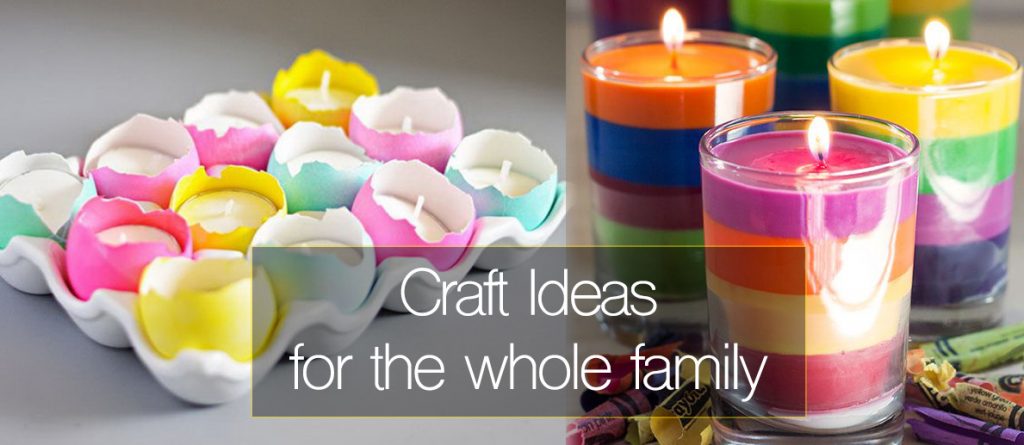
Calling All Parents! – Easy craft ideas for kids to make at home
Struggling to find educational activities to do with your children? Or are you just wanting some quiet time for yourself?
Well, here at Cosy Owl we have the perfect solution for you – Candles! Candle making is a great blend of art and science, with so much mathematics and science involved, this can be the perfect way to entertain the little ones whilst also giving them a bit of practical education as well! The process involves weighing, measuring, observing, fine control and ultimately allowing your creativity run wild to make something that you will all be proud of. Crafts are also great for relieving stress and anxiety, something that we can all benefit from in these difficult times and at the end of the day we guarantee that you will be able to sit down, put your feet up and enjoy the ambience of your creation.
At Cosy Owl, we are passionate about candles and candle making and we are always looking for ways to inspire people to get involved in the craft, so below, we have come up with a number of ideas to try with your family. Get the kids involved, use these ideas as inspiration and let the creativity flow. All our ideas come with full instructions and a list of all the products you will need and many include items that you will have around your house that can be upcycled.
If any of these ideas tickle your fancy and gets your creative juices flowing, then do send in any images of the creation process and the final result and we will publish them and show them to the world – there is nothing we love more than seeing what people create, especially when kids are involved – they often have the best ideas! Enjoy and share your results!
Fun Fact!
Candles Owe their existence to the ancient Romans. They began producing dipped tallow candles in the year 500 BC. These early candles were made using tallow wax, which was derived from the meat of cows and sheep, and an unwound strand of twine. Today’s methods are much more animal friendly with most of our products now being Vegan Friendly and Cruelty Free!
The following guides will help you and your little ones explore the wonders of candle making whilst also learning something new. These can be done with things you may already have in your home, with a little extra help from us!
Dipped Candles

You may be wondering what exactly we mean by this. Well, back in Roman times they began making candles by dipping twine into their homemade wax in order to make their candles. Doing this can create beautiful, unique pillar candles, and it is certainly a way to fill time with your kids. Please ensure children are always under adult supervision during this process. Before you get started you need to ensure that your workspace is clean and clear, and you have the following items to hand:
Ingredients
- A heat source to melt the wax
- Bain Marie or a pan inside a pan to melt the wax in
- Something to stir the wax with
- Thermometer
- 800g KeraSoy 4120 Pillar Wax
- TCR 15/8 Raw Wick
- A Clothes Peg
- A Clothes Hanger to hand your finished candles to set
Method
Step 1 – Prepare your double boiler or pan by adding water to the outside layer. Pour your wax into the container to melt. Melt the wax at a controlled temperature, no higher than 65°, until the wax is completely melted.
Step 2 (optional) – if you have chosen to add fragrance or dye, now is the time to do so. For this you will need to reduce the heat, and pour in your fragrance (between 7-12%, see our info and guides section for more) and a small pinch of dye.
Step 3 – reduce the heat of your wax and prepare your wick. You do not want to remove your wax completely from the heat as this will cause the wax to solidify. To prepare your wick, simply decide on the length you would like your candle to be and attach clothes peg to the top.
Step 4 – Begin dipping your wick. You may want to allow a few seconds between dips to allow time for the wax to set. Please ensure the wick remains as straight as possible throughout this process, you may want to use additional clothes pegs to pull the wick straight in the beginning stages. Repeat this step until your candle is the thickness you would like. If your wax is beginning to run low, use a spoon to lift and pour the wax on the outer parts of your candle.
Step 5 – Now it is time to allow your candles to harden. For this I recommend using a trouser hanger or wire coat hanger (something with a bar across the bottom). Attach your clothes pegs to the hanger and hang your candles up to dry for at least 24 hours.
Step 6 – Time to clean up. If you have any melted wax left by the end of this process, you may want to pour this into a tub for later use. If any spills or drips have occurred, it is best to wipe them away whilst the wax is still warm with a paper towel. If you find that any unwanted wax is hard to remove, try using a warm damp cloth to help melt and remove the wax from your surface.
For any advice or to talk through your project with one of our advisors, please do not hesitate to contact us at The Cosy Owl on 01376 560 348.
Rainbow Candles

This uplifting rainbow inspired idea will get the creative juices flowing! The perfect way to raise your spirits and educate at the same time! Please ensure children are always under adult supervision during this process. This guide will create up to 5 Candles. Before you get started you need to ensure that your workspace is clean and clear, and you have the following items to hand:
Ingredients
- A Heat source to melt the wax
- Beka Bain Marie or a pan inside a pan to melt the wax in
- Wax Thermometer
- 800g KeraSoy 4130 Container Wax
- 5x ECO 10 wicks
- 5x 20cl Karen Round Glasses
- 50ml Fragrance (optional)
- 5x Bekro dye colours of your choice
- Wick Centering Tool / Clothes Peg
- Glue Dots
Method
Step 1 – Prepare your double boiler or pan by adding water to the outside layer. Divide your wax into 5 portions. Pour one portion of your wax into the container to melt. Melt the wax at a controlled temperature, no higher than 65°, until the wax is completely melted.
Step 2 – Prepare your containers! For this step you will need to attach your glue dot to the metal tab of your wick. Place this in the bottom of your container, as centrally as possible. Hold your wick in position with your wick centering tool or clothes peg.
Step 3 (optional)– if you have chosen to add fragrance, now is the time to do so. For this you will need to reduce the heat, and pour in your fragrance (between 7-12%, see our info and guides section for more).
Step 4 – Time to add some colour! Be careful with this step as the wax will need to remain warm. Start with a small pinch of colour and stir well to ensure all the wax is dyed. You may decide to add more dye for a more vivid colour. Remember a little goes a long way!
Step 5 – Pouring! Slowly and gently pour this wax into your pre-assembled containers and allow to set.
Step 6 – Repeat steps 1 – 5 until you have created your rainbow! Allow your candles to harden for a minimum of 24 hours
Step 7 – Time to clean up. If you have any melted wax left by the end of this process, you may want to pour this into a tub for later use. If any spills or drips have occurred, it is best to wipe them away whilst the wax is still warm with a paper towel. If you find that any unwanted wax is hard to remove, try using a warm damp cloth to help melt and remove the wax from your surface.
Step 8– Enjoy! (make sure to keep your wick trimmed to 1cm or less to get the full burn potential) For any advice or to talk through your project with one of our advisors, please do not hesitate to contact us at The Cosy Owl on 01376 560 348.
Ice Candles

This crafty little science experiment will get your little ones excited to learn! This project will explore the world of particles and their density. With water being largely denser than wax, when adding wax into a container of ice cubes, the hot wax solidifies once it hits the ice cubes which melt and leave holes behind in the wax. It is a common misconception that wax is denser that water. Water is in fact the denser substance as the oxygen in water heavier and smaller than the carbon in wax.
Fun Fact! – Paraffin wax is used in lava lamps!
Paraffin wax is used in a mixture with carbon tetrachloride (CCl4). This makes a substance which has a slightly higher in density than water when solid but is much less dense when molten giving you the cool lava effect!
Please ensure children are always under adult supervision during this process. Before you get started you need to ensure that your workspace is clean and clear, and you have the following items to hand:
Ingredients
- A Heat source to melt the wax
- Beka Bain Marie or a pan inside a pan to melt the wax in
- Wax Thermometer
- 5x Candle Moulds (bottom of a carton or plastic cup. See-through if possible)
- 5x ECO Wicks ( the size is based on the diameter of your chosen container see Percentages & Measurements for more info)
- 800g KeraSoy 4120 Pillar Wax
- 3g Bekro Dye in your chosen colour
- Ice Cubes (enough to fill your containers)
- Wick Centering Tool / Clothes peg
Method
Step 1 – Prepare your double boiler or pan by adding water to the outside layer. Pour your wax into the container to melt. Melt the wax at a controlled temperature, no higher than 65°, until the wax is completely melted.
Step 2 – prepare your containers. Position the wick in the centre of your container using your wick centering tool or clothes peg to hold this in place. Add your ice cubes in random order or try to build a pattern if you want a more organised finish. Make sure to leave space between each cube and a space surrounding the wick for the wax to surround this.
Step 3 – Once your wax has reached temperature, reduce the heat. Add a small pinch of dye to begin colouring your wax. A little amount will go a long way.
Step 4 – Once your colour is completely blended in, begin slowly pouring the wax into the container. One you have finished pouring, set the candle aside to cool for around 12-24 hours. If you have chosen a see-through container, watch as the ice melts, leaving a cool pattern in the candle.
Step 5 – once all the ice has melted and the candle is set, gently remove the candle from the containers. Leave to dry for another 2 – 5 hours.
Step 6 – Time to clean up. If you have any melted wax left by the end of this process, you may want to pour this into a tub for later use. If any spills or drips have occurred, it is best to wipe them away whilst the wax is still warm with a paper towel. If you find that any unwanted wax is hard to remove, try using a warm damp cloth to help melt and remove the wax from your surface.
Step 7 – Enjoy! (make sure to keep your wick trimmed to 1cm or less to get the full burn potential) For any advice or to talk through your project with one of our advisors, please do not hesitate to contact us at The Cosy Owl on 01376 560 348.
Easter Egg Shell Candles

Struggling to get into the Easter spirit? We have just the thing for you! With this simple yet beautiful idea you can create these colourful Easter themed candles! Don’t be afraid to get the little ones involved too! Perfect for children ages 3+. Please ensure children are always under adult supervision during this process. Before you get started you need to ensure that your workspace is clean and clear, and you have the following items to hand:
Ingredients
- A Heat source to melt the wax
- Beka Bain Marie or a pan inside a pan to melt the wax in
- Wax Thermometer
- Safety pin
- Eggs
- Coloured paints
- Egg box or Egg cups
- KeraSoy 4130 Container Wax
- Glue dots
- TCR 15/8 Wicks
- Wick Centering Tool or clothes peg
- Bekro Dye (colours of your choosing)
- Fragrance oil of your choosing. (Chocolate would be a fantastic fragrance for this Easter inspired candle)
Method
Step 1 – Decorate your Eggs. This can be done by using paint, crayons, glitter etc.
Step 2 – Prepare your double boiler or pan by adding water to the outside layer. Pour your wax into the container to melt. Melt the wax at a controlled temperature, no higher than 65°, until the wax is completely melted.
Step 3 – Prepare your Eggs. Using your safety pin, carefully puncturing a hole in the top of the egg, remove small pieces of the shell to remove the contents. You will want to create a reasonably sized hole in the top of your egg for access into the shell. Clear out the membrane using the tip of your finger and rinse.
Step 4 – Once the candle is dry, attach your wick into the bottom of your egg by using a glue dot applied to the metal tab. And stabilise the shell using the egg box or egg cups.
Step 5 – Once your wax has reached temperature, reduce the heat. Now it is time to add your fragrance and dye. For this you will need to reduce the heat, and pour in your fragrance (between 7-12%, see our info and guides section for more) and a small pinch of dye.
Step 6 – Pouring! Slowly and gently pour this wax into your pre-assembled eggs and allow to set. Be careful not to over pour your wax due to the cracks being different heights. Using your wick centering tool or clothes peg, hold the top of the wick in place in the centre of your candle. Leave your candle to set for at least 24 hours.
Step 7 – Time to clean up. If you have any melted wax left by the end of this process, you may want to pour this into a tub for later use. If any spills or drips have occurred, it is best to wipe them away whilst the wax is still warm with a paper towel. If you find that any unwanted wax is hard to remove, try using a warm damp cloth to help melt and remove the wax from your surface.
Step 8 – Trim your wick to around 1cm long and enjoy! (make sure to keep your wick trimmed to 1cm or less to get the full burn potential) For any advice or to talk through your project with one of our advisors, please do not hesitate to contact us at The Cosy Owl on 01376 560 348.
Something for the adults… Wine Glass Chick Candles

This beautiful and elegant design will help spruce up you home and get you into the Easter spirit. With a little help from our expert team at Cosy Owl, this simple guide to help you show off your skills. Before you get started you need to ensure that your workspace is clean and clear, and you have the following items to hand:
Ingredients
- A heat source to melt the wax
- Beka Bain Marie or a pan inside a pan to melt the wax in
- Wax Thermometer
- Candle moulds / empty containers or plastic cups
- 800g KeraSoy 4120 Pillar Wax
- 5x ECO Wicks ( the size is based on the diameter of your chosen container see Percentages & Measurements for more info)
- Optional – 3g Bekro Dye in your chosen colour
- Optional – 50ml of your chosen fragrance
- Wick Centering Tool / Clothes Peg
- Wine glass(s)
- Decorative materials (paints, coloured pens, feathers, glitter)
Method
Step 1 – Prepare your double boiler or pan by adding water to the outside layer. Pour your wax into the container to melt. Melt the wax at a controlled temperature, no higher than 65°, until the wax is completely melted.
Step 2 – Prepare your containers. You will want to ensure they are free of any dirt or particles and are dry. Position the wick in the centre of your container using your wick centering tool or clothes peg to hold this in place.
Step 3 – Optional – Once your wax has reached temperature, reduce the heat. Add a small pinch of dye to begin colouring your wax. A little amount will go a long way. You may also now add your fragrance. To calculate the amount of fragrance needed, please refer to our Weighing Your Fragrance guide.
Step 4 – Providing the temperature is 60°C or lower, you can now pour your wax slowly into the mould, pouring slowly is essential to reduce the risk of air bubbles/pockets. You will want to fill the container all the way to the tip, left over wax should be poured back into the heating container as you may need this for a repour. Leave this to set on a flat surface for around 20 – 30 minutes, if you need to do a repour do this at this stage.
Step 5 – Leave the candle to cool for around 12-24 hours before removing the candle from the mould. The candle should have shrunk as its cooled, enough so that you can release the candle from the mould with ease. If not using a hairdryer gently heat the edges until the candle is freed.
Step 6 – Decoration! Turn your wine glass upside down to begin. To create the chick candle holder, paint the entire cup yellow. Using feathers or tissue paper create the fluffy chick body. Using coloured pens, you can then draw the fact of your chick. Complete the design by adding your pillar candle to the top of the glass (which is the base).
Step 7 – Time to clean up. If you have any melted wax left by the end of this process, you may want to pour this into a tub for later use. If any spills or drips have occurred, it is best to wipe them away whilst the wax is still warm with a paper towel. If you find that any unwanted wax is hard to remove, try using a warm damp cloth to help melt and remove the wax from your surface.
Step 8 – Trim the wick to 1cm or less and enjoy! For any advice or to talk through your project with one of our advisors, please do not hesitate to contact us at The Cosy Owl on 01376 560 348.


Leave A Comment